Games-part 3-Board Games

This is going to be a quick post about our two favorite board games.

Monopoly

You can say what you like, but I have been a fan of this game since my cousin introduced me to it 20+ years ago. You can also play by Poppop’s rules to make the game go faster. His rules are that when you land on Purple property, you can then buy all the purples, thus securing the monopoly and the ability to build on them. Caleb however has rejected the short version rules, so now we play the regular way.

Things he’s learned from Monopoly:

Percentages: You take ten percent of all your money when you land on income tax, so he has gotten very proficient at managing percentages. Because, really, once you understand the concept enough to get 10%, it’s easy enough to translate that into figuring out 25% of dowels at the craft store.

Rounding: Lately we’ve taken to not using the $1’s (and then $5’s), and rounding the rents to the nearest 5 (or 10 respectively). Rounding isn’t really that difficult, but I remember plenty of boring worksheets directed to practicing this skill.

Addition of hundreds: The game didn’t teach him how to add, but it does give good practice with adding pretty large numbers.

Reading Practice: All the streets/squares are named, plus there are community chest and chance cards.

Acquire

I have never met anyone outside of my dad’s side of the family that has played or even heard of this game, but it deserves mention.

Basically you play tiles on a board to create “hotels.” Once a hotel has been created, you can buy stock in the hotel. There are mergers where you get bonuses, and you can sell or trade your stock.

Caleb and I started out with this game by just putting on tiles, then I taught him about the hotels, then he learned some more rules, and so on until he was playing an entire game (although it took FOREVER, so I always had some sanding or reading to do on the side, since four/five year old’s are easily distracted). He wanted to learn how to play, because that what the grown ups around him liked doing, and he wanted to be included.

Acquire is best with 3 people, but we only have 2 of us, so we just use the same rules as for 3+ people.

Things he’s learned or practiced from Acquire:

Multiplication: You can buy up to 3 stocks at a time which range from $200 to $1200 each. So if you want three, then you practice 3 $200’s. And of course, it’s easier to think about it like 3 2’s, so he’s learning how the numbers even into the thousands relate to each other in the same ways as little numbers do. If you want to sell your stock after a merger, then you have to multiply 8 or 13 times $200 or $800.

You can also trade your stock, but you have to trade 2 for 1, so you have to determine whether you would make money  on the trade.

So really there is a lot of working with numbers in general up into the ten-thousandth’s place: addition, subtraction, multiplication, a little bit of division.

Caleb is adding up the final score.

Caleb is adding up the final score.

Those are our 2 favorite long board games. I’ll be back tomorrow with some more games and thoughts about learning.

Games-part 2

These games are the middle ground between the more complicated games and the super easy (baby) games. Some of them require a good deal of coordination, more advanced number skills, or some other skill.

These are 3 of the most played games in our house.

Gin Rummy

Check out the rules via the link, but basically you are trading in cards trying to get 3 (or more) of a kind or a run of 3 (or more) cards (8,9,10 or 10, J, Q). Aces are low. 

Keeping score practices good math skills. If you get “gin,” you’ll get 25 points, plus whatever non-matched cards your opponent has (the number cards equal the face value and face cards are 10 points each). If you don’t have gin, you subtract your points leftover from your opponents points.

I never pressured Caleb to add up the score, but after we’d been playing it a few weeks, he insisted on adding it up himself most of the time.

Rook

Rook is played with Rook cards, not regular playing cards, which is possibly why it was such a hit in my father’s family, seeing as how they were forbidden to play with regular cards. Anyway, we play the “Kentucky” version, where you remove the 2,3, and 4’s from the deck. You can play with 2, 3, or 4 people. For obvious reasons, when we’re at home we play 2 man.

In Rook, you place a bid or a guess at how many points you think you will take. Not all the cards are worth points, and all the point values are in increments of 5. I would say adding up the points in Rook is what really got Caleb comfortable adding by fives.

Dutch Blitz

Dutch Blitz is a super fun game. You can play with 2-4 players, though 4 is best. At home we play with 2, because that’s all we have, but it’s a much slower game then (which isn’t a bad thing with little kids).

You have to be quick, coordinated, and alert to be good at this game. The way the scoring works is that you can get points off if you aren’t the winner of the round. And if you don’t get enough added points, you go into the negative.

Dutch Blitz introduced Caleb to negative numbers, and after a few explanations, he understood the concept, and now uses them with ease in addition and subtraction.

We play at least one of these three games every single day. Many times all three of them. They are fairly quick games (with the possible exception of Gin Rummy), so we usually play best of three (or lately, the best of three best of threes).

I need to get back to work, but I’ll have a few more games for you tomorrow.

Our favorite games for little kids…and what skills they encourage

First I have to give a disclaimer:

We play games that are fun (or at least fun for my son), because they are fun. I take a dim view of “educational” games, which are generally heavy on the “education” and light on the fun and interesting. We also love playing games, I don’t recommend forcing games on your kid so they learn stuff. If you force someone to do something, they will be resistant to learning (or doing) whatever it is you wish them to learn (or do).

So I’m giving recommendations for our favorite games. Learning is a byproduct of these games, but not the intended goal.

I’ll start with the games for the littlest kids and work my way up. I linked to descriptions or rules for each game. There are probably thousands of games out there, but for our house, I’ve mostly stuck to the tried and true board games, add playing cards and some dice, and you have enough games to last you the rest of your life.

Almost all our games were bought at thrift stores. Especially for little kid games, that is the only way to go.

Candy Land

There is a reason this game is a classic. It’s super simple, uses colors instead of numbers, so any kid that can sit still long enough can play it. It helps kids get used to winning and losing, taking turns, and other game playing skills. And yes, it can take forever. If you are in a hurry, you can remove the special picture cards the second time through the deck so no one has to go backwards.

Chutes and Ladders (or Snakes and Ladders)

This game has 100 spaces, with a spinner that goes up to 6 to tell you where to move. We started playing chutes and ladders when Caleb was about 4, and at that point he knew 1-10, but didn’t have a strong grasp of the other numbers. The more we played, the more he recognized and understood the numbers. The way the board is set up, it also reinforces the idea that our number system is built around 10’s.

UNO

This was one of the first card games we started playing. And I have to say that we always play “stack” rules. Which means that if you have four 9’s of varying colors, you can stack them up and play them all at once. We also play that you have to draw cards until you get one that you can play, so playing stack rules, it keeps the game from being torturously long.

Since there are only 2 of us, and Uno is a more interesting game with mulitple players (for the skip cards and the reverse cards), we often play with dummies. Buzz Lightyear and the sharp tooth dinosaur will play and we just choose their cards for them. The rule is we have to play the cards that would help them the most (not ourselves).

100_0816

A note about card games with little kids:

We started playing card games when Caleb was four. At that point, he didn’t have the skills to hold his cards in his hands. For Uno, where it doesn’t matter much if everyone sees your cards, he would just leave them face up on the ground. For something like Go Fish, he would use a board or pillows or something to hide the cards on the ground. 

Go Fish

Go Fish is an easy game that introduces playing cards (jacks, queens, etc.). It’s good for little kids. The more they pay attention to the game and remember what people asked for, the better they’ll do.

Egyptian Ratscrew

This game you slap the pile when there are two of a kind in a row (two 3’s, two jacks, etc.). It’s an easy game that requires no skill to play, but the faster you are, the more likely it is that you will win.

The games in this post are for all ages, most of them have very little skill, and they are mainly for building the skills it will take to play more challenging games later. Those skills translate into good real life skills as well.

In my next post, I’ll move on to some games that take more skill or at least more thought.

Food Gifts-Maple Roasted Peanuts Instuctions

Who doesn’t like getting delicious food for a present?

Last year for a present, I gave one of my brothers the gift of a free home cooked something for every month of the year. Since he lives in Washington, DC, I probably spent more on shipping then on the cost of the ingredients, but I think he really appreciated it. He doesn’t make much for himself beyond pizza.

This year I gave out some of my homemade applesauce that I canned, some homemade granola, and maple roasted peanuts (and walnuts). I tried not to give anything that was too unhealthy, but still stuff that was delicious and special.

The peanuts and the walnuts I did like this:

I heated maple syrup to 240 degrees (F), and then immediately dumped it on top of the peanuts in a bowl. Then I mixed it all up. The syrup starts crystallizing almost immediately, so mix it up, and then spread it out on a cookie sheet to cool.

Of course when I went to make my big batch (after the test batch), I didn’t get the syrup quite hot enough and it didn’t crystallize. Everything hardened into a sticky mess. So I put it in the oven and baked it until the syrup started crystallizing in there, and then pulled it out.

They came out great! Everyone loved them. I will definitely make them again.

I put them in a variety of jars with labels that I printed up from the computer. I called them Mama’s Maple Roasted Peanuts (or Walnuts). They were so good, I was wishing I had made some for myself, because of course, I didn’t think of that.

They were the perfect thing to keep handy for surprise gifts. You know, you get together with someone that you weren’t expecting to see around Christmas time, and I like to come with a present–but not anything big so as to make them uncomfortable for not giving you anything. The maple roasted nuts were just the right touch of special and simple that you could give to anyone.

I gave some to my brothers, my dad, my friends, the mailman… 🙂

Move

I was watching (well, listening really, while I was doing other things) a Ted Talk by Sir Ken Robinson about escaping the death valley of education, and he dropped in this quote from Benjamin Franklin:

“All mankind is divided into three classes:

those that are immovable, (never ever going to change)

those that are movable, (theoretically they might change)

and those that move.”

In my adult life, which started after I graduated from college (which is when I became pregnant with my son, certainly my adult life wouldn’t have started so soon if I hadn’t had that profoundly life changing experience), I never even considered being immovable. I wanted to learn and think about things in a different way. I read books by people with odd and revolutionary ideas. I thought about how I could live the life I wanted to live without falling into the standard paths.

But most of all, I didn’t want to be movable–you know, the kind of person that always talks about doing things, but never does them. Like the way the American “Education” system (and certain US presidents) always TALK about changing, but you find out that the “new” way is more of the same.

I wanted (WANT) to MOVE. Quite literally, I talked about moving to a cheaper location where I could afford to be a mother and pay the rent/mortgage. And then I did move.

I don’t just want to talk about giving children freedom and treating them unconditionally. I want to LIVE it. I don’t want to believe in things in theory, and not have the guts to live it out.

Because it’s hard moving when it seems like you are the only one doing things differently. Some people probably won’t like it. Some people will draw conclusions about you that are unfair: that you are reckless and thoughtless and neglectful (or on the other hand, that you are hamstringing your kids by not pushing them into the real world (of school, their own beds, weaning at an early age, etc.).

But you aren’t really alone. You’ll face opposition, but everyone does. And if you take off your martyrdom glasses you will see other people moving too. Other people that are doing what they believe in too.

Be courageous. Act on your beliefs. Because you will never know if you really believe in something until it becomes an action.

Christmas Presents-Part Two-Small Bookshelf

Well, I got back to West Virginia (also known as Real Life) Wednesday night. The furnace went out, there were at least 3 breaks in the water lines, and well, that was it, but it’s enough, right?

And here I am making excuses for not blogging again.

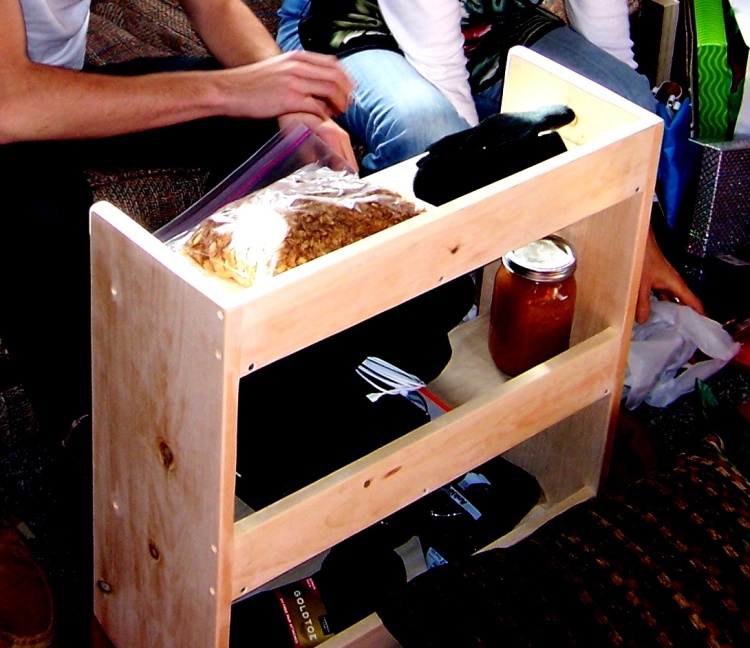
The second present that I made this year was a small bookshelf for my brother. He rents a room right outside of DC (where he works), and it is Small. It’s also packed with books. So I wanted to give him the most shelf space for the smallest bookshelf.

100_0790

Somehow, this was the only picture I took of it (see? he’s using it already!), so I called my brother and asked him for a picture. So here it is in action:

IMG_7194

Kind of looks like he’ll need another one for his birthday, doesn’t it?

The sides and back pieces were pine, and the shelves were 1/2″ inch thick poplar. I just screwed the shelves in place, no fancy joinery, but it’s a pretty sturdy piece of furniture nonetheless.

I used 1×4’s for the backs of the shelves, because I wanted to keep the bookshelf solid wood (no plywood), but I didn’t want it to be too heavy.

The top of the piece is sunken in to give him a bonus shelf, because you always end up piling books on top of a shelf like that too, don’t you?

I offered to stain and finish it to match his color scheme, but he just laughed and said he had an unfinished dresser, so it would be fine as is.

Making your own furniture doesn’t have to be complicated. You don’t have to follow patterns or plans. Just come up with an idea and run with it. Of course it helps if you have a full workshop in your basement, I’m sure.

Well, I’m off to Busy Beaver to buy more pipe fittings to finish fixing the pipes (I found a fourth break) so we can wash some dishes and do the laundry.

You can find some clues to other Christmas presents I made sitting right on the bookshelf (in the first picture). I’ll be back soon with more gift ideas.

Christmas Presents-Part One: Handmade Wooden Salad Utensils

It’s been so long since I’ve blogged, I was feeling intimidated getting back into it. Do I really have anything to say? Why would anyone care? And all that downer nonsense you can get into.

So it came down to abandoning the blog or just starting small.

I opted for a small start by telling you about the Christmas presents I made for my friends and family.

First up: handmade wooden salad utensils

IMG_0234


I stared with a  block of cherry wood that had a pleasing grain. I traced a large plastic spoon I already had on the face of the block, and then cut it out with my scroll saw.

Then I traced the curve of the spoon (modified for size) on the edge of the spoon cut out, and I cut that part with my bandsaw.

I started carving the bowl of the spoon with my dremel, but as I didn’t have anything close to the right sort of bit, it wasn’t working very well, so I decided to cut to the chase and drill a large hole with a forstner bit.

The drilling left me with a deep middle, and then between my dremel sanding bands, and my belt sander, I roughed out the edges of the spoon bowl.

Unconventional to be sure, but effective.

I never got the bowl completely flat, but I sanded it a lot and got it smooth.

The fork I handle much the same way, but I didn’t have to worry about the bowl, so I could just cut out the tines with my saw.

IMG_0234

The spoon and fork were a gift for my dad. I’d like to do more of them, but I doubt that I would sell them. They took me sometime over an hour, spoon obviously being the more involved of the two.

I’ll be posting more of the presents that I made in the coming week.

What did you make? How did it turn out? What ideas do you have for next year? 🙂